Thursday, May 31, 2012

Favorite Card

This first one is my favorite card so far. I snatched the idea from another blog and used my own colors, but I still love it and will try to make a few more to have in my stock. I could use it for Thank You's, Anniversary's and Birthday's. Pretty much any occasion with the right sentiment.
The next card is my attempt at a simple flower card, but it is too simple and I need to add embellishments or just start over.

Wednesday, May 30, 2012

Thank You Card

I made this Thank You card to submit to the challenge at Peachy Keen. I did not use a Peachy Keen stamp but I followed the color scheme. I used the Florals Embellished cartridge.

Wahoo! So excited I made top 3 in the challenge with this card!

Layout


Created my first layout today using Create a Critter again. I use that cartridge a lot! I got Art Philosophy in the mail yesterday and yet I still played with Critter today. I need to order the last 6 months of pictures so that I can create new layouts with them.

Tuesday, May 29, 2012

Sleeping Bear Dunes


While I was away and missing my crafts I got to enjoy some beautiful sites in Leelanau County, Michigan. This area was recently voted the most beautiful place in America on Good Morning America. I feel really lucky to have grown up there and be able to visit every year. I recommend visiting for two weeks if you can because there is so much to see and do.

Pierce Stocking Drive View of Glen Lake

Can you see all the crazy people climbing the bluff? It is quite a feat to make it all the way down and back. I have only done it once when I was much younger! This is a view of Lake Michigan.

My son playing on the top of Pyramid Point, Sleeping Bear Dunes Lakeshore.

My daughter playing in the ice cold water of Lake Michigan while we watch the sunset.


Friday, May 25, 2012

Have a Great Memorial Weekend!


I don't have a craft to display today but I am proud to say that I finished the 2nd coat of paint in the kitchen and tonight I will be finishing the vinyl water bottles I started earlier. I am leaving for the weekend to visit with family, so will not be posting again until Tuesday, when I plan to really put a hurting to my crafting goals and the kitchen cupboards :) I'm tempted to stay home and work on projects but the kids want to see Grandma and Grandpa and all their cousins.

Hubby is fishing in Canada until Monday so just the kids and I are headed to the beautiful area of Traverse City. Hopefully I can get some great pictures while I'm there but my camera is on the fritz :(

Thursday, May 24, 2012

Birthday Card

I have been slowly trying to redo my kitchen by painting the cupboards white and removing the wallpaper and painting the walls. This is a very slooooow process. I have to sand each door, prime them three times, add bead board then paint them white. Today I put the first coat of paint on the walls which only took 1-1/2 hours. It is already looking brighter! I love it and can't wait to be finished. When it is all done I will have many pictures, it will be a total transformation!

Today I created a birthday card based on a card by www.smallbitsofpaper.blogspot.com. I absolutely loved their colors and happened to just have bought a packet of similar colors, plus I finally got to try out my new Cuttlebug! I am waiting on my stamps so that I can stamp Happy Birthday on the bottom and add a bow. I don't think the colors come out as nicely in picture as they are on paper :(


Wednesday, May 23, 2012

Menu Planner


This year we are determined to put an addition on our home. Our house has been for sale for 3 years and we've only had 3 showings even dropping the price considerably. In order to make room for our 4th child and to be happier in our house we are adding a new living room, bathroom, bedroom and closets. This means Penny Pinching.

Today was the start of our frugal living. I hung all the clothes out on the line to dry, I didn't drive anywhere and I taped a bunch of shows so that I could suspend our TV for the summer and save $50 a month.

I also decided to be more efficient at planning meals. Here is a Menu Planner I made today based on the design at Clairs Fairy Tale.

Of course I had to use my Cricut, for the lettering (Plantin Schoolbook), the boxes (Once Upon a Princess) and it helped me make perfect squares for the recipe cards. I wish I had done them smaller but I had to fit the ingredients on the back of each card. 

Here is the original I found on Pinterest:

I love being able to use all my little tools. I even got out the Laminator for the cards to make them more durable. I figured I can grab them and take them grocery shopping with me and they will still hold up. I purchased the Laminator off Amazon back in December for $16.99, I never realized how much I would use it. Here is the link, maybe it will go on sale again: Laminator and you can get one too!

I haven't hung the Menu Planner up in my kitchen yet because I am really short on wall space, but I will find a spot because I think it is really cute and should make meals more convenient.

I went through my cookbook and found 32 recipes that are tried and true. No new ones were included. So I have a months rotation before we have to start over again. I think this will help me incorporate more fruits and vegetables into our menu.

I entered this into the Copy Cat Challenge at http://www.kraftygirls.com/ I could enter so many projects into this challenge because I love so many things that people do but this is my favorite right now.

Tuesday, May 22, 2012

Hershey Pie


My all time favorite dessert and better be included in my last meal before I die is Burger King's Hershey Pie. With my birthday last week, I always request this for my cake, but this year I wanted to try to make it myself. It is not exactly the same, as they probably have secret ingredients (that are usually very unhealthy) but it is still pretty delicious.

Hershey Pie Recipe


Chocolate wafer crust or smash some oreo's up, add 1/4 cup melted butter and press into bottom of pan. If your patient put this mix in the fridge for a little while. If not move onto next step :)

Whip 8 oz of softened Cream Cheese until smooth
Add 3/4 cup Confectioner's Sugar
8 oz of Whip Cream
1 Tsp Vanilla Extract

Carefully spread onto crust.

Mix a small packet of Chocolate Pudding with 1-1/2 cups milk and spread over pie.

You can stop here and it is really good or you can add a layer of whip cream or just add a dollop when serving. You can also add chocolate chips or shavings for a garnish, but it is just as good if you skip these steps.


Today I purchased the Hershey Creme pie by Edwards. The main difference between my recipe and theirs I think is they add whip cream to the pudding layer and they drizzle a chocolate syrup that hardens on the top and sprinkle with mini chocolate chips. The crust is different too, but I kind of like my oreo crust better. 

Monday, May 21, 2012

Wooden Caddy for Bath Supplies


A few days ago I posted the mason jar etching project I did and today the UPS dropped off the rest of the supplies so I could finish up the wooden caddy for my mother-in-law. I made bath salts and a bath scrub to put in the other three mason jars.

Bath Salts

Combine 1 part Epsom Salt with 1/4 part Coarse Sea Salt. 
I wasn't sure how much I needed so I did one cup of Epsom salt and 1/4 cup sea salt at a time until the jar was full. Then I dumped into a large glass bowl and added a few drops of food coloring and a few drop of essence oil. I choose Lavender for one and Amazing Grace Woman for the other. I mixed them with my hands because it seemed the best way to get a good combination and break up the coloring.

Sugar Scrub

Ingredients: white sugar, oil , and essence.

This scrub is made from one part sugar and about 1/2 part cocoa butter baby oil. I also added a Mango Apple essence to it and a little yellow and red food coloring.

For mother's day I made a hand scrub that was 2 1/2 cups sugar, 1 cup olive oil and 1/4 cup lemon juice. That turned out really nice and the guys really liked it because it wasn't too girly. This one I was aiming more for her to use in the tub so I kept it sweet smelling.

I printed off labels using Plantin Schoolbook on the Cricut and my HP printer. As you can see I also added burlap ribbon and twine to the jars and spray painted the lids. I also tied two wooden scoops to the ends for the salts.

UPDATE: She loved it and said it matched her decorating style perfectly. She also uses the bath salts a lot, so it was the perfect gift!

How to Print on Cricut Cuts


I wasn't lucky enough to get the Imagine machine, so I make do using my printer for some of my prints. Here is an example of how I print on labels.

First design your wording on the computer and print it off.
 Then lightly tape your desired paper over top the print as you want it to look.
 Then run it through the printer again. My printer is loaded by placing the face down and the top first. Printers are all different though so you may have to experiment first by putting marks on the white paper. Try this before wasting your nice scraping paper.
I used this method to make labels for the bath salts and sugar scrubs in my next project and to print off cute sayings for cards and such.

First Challenge


I've been following the challenges on http://fantabulouscricut.blogspot.com/ and this week decided to join in the fun!

This year we only have one family member graduating from high school. This is unusual for us with 59 first cousins between my husband and I. We usually have at least 2 or 3 graduates a year, but I guess everyone is starting to get older and we are starting to see more college graduations.

Here is the card I created for this year's graduate. The only cartridge I used was Plantin Schoolbook for the starburst, number and letters. I was expecting to use a cute cartoon image, but I think I'm going to experiment with another one. The #1 is popped up to add dimension and I used a silver pen to add embellishment, other than that I think it is a pretty simple card.

I also submitted to this week's challenge at Craft Spot by Kimberly and
4 Crafty Chicks

Cricut Tearing


I wanted to share a problem I had with my Cricut today. I cut a lot of vinyl yesterday and today when I went back to paper it was tearing the paper rather then cutting it. I only got the machine a week ago and I was worried I wore my blade out already, but I decided to mess with the dials first. I believe the main issue was that  my speed was too slow. You would think the slower the better, but that is not the case. You really need to adjust your pressure, speed and blade for each type of material and not try to use the same basic settings.

Check out this blog for a settings chart. I printed it off and taped it to my Cricut to refer to especially because I am changing my material all the time. Someday I even want to try fabric!


Sunday, May 20, 2012

Vinyl Water Bottles

I finally got to sit down to the Cricut again after a day and half away. I'm addicted! I did get to stop at Michael's yesterday though and use a few coupons and get more paper. When I first walked in I found these really cute kid's water bottles for sale for $1. With my coupons I got them for $0.82, so I picked one up for my kids and nieces and nephews. 

Tonight I decorated four of them with vinyl and the Cricut. I used the Create a Critter cartridge to pick out a cute critter for each kid and used the Plantin Schoolbook to spell their names. The critters were 3" and the letters range from 1-1/4" to 1-3/4". I tried some using transfer paper and some without. It is a little tricky either way getting the names straight, but I know the kids won't care either way.


The easiest way is to layer the critters while still on the mat. I tend to skip the bottom layer if I can especially if it is just the black for the eyes. It is also a little easier to cut the vinyl without backing but it can be done either way.

Chicken Coop


On Saturday we moved the chicks into the coop and out of our basement. We haven't quite had them for 2 weeks but it was 85 degrees yesterday, so we figured it would be okay. They were quickly outgrowing the brooder they were in. We had to be away all evening so didn't get to check on them again until this morning and found the two biggest ones dead! After some research we think that they may have had "pasty butt". Meaning their poop blocked their intestines and clogged them up. Yuck! Not positive this was it though.

We set up the heating lamp so they could stay warm at night and hopefully we won't lose anymore. I'm afraid we will though, because a few look like they are a little deformed. I'm hoping we can butcher at least ten.

Our three year old is our little farm girl. She loves getting in and playing with the chicks. We have to keep telling her to stop picking them up, because we're afraid she will hurt them. The older two kids are not as sure and definitely don't try to pick them up. It is cute to see her talking to the pigs or playing with the puppy. She gives all of the animals the most attention.


Friday, May 18, 2012

Vinyl T-shirt Prints


I love trying all these new ideas with the Cricut! First glass etching now vinyl prints. I made three t-shirts today within about an hour and half. First one was a Hippo t-shirt for my 3 year old. I wanted to try the Zebra but she insisted on the Hippo from Create a Critter cartridge. I cut it at 4-1/2" and I skipped the basic shape. I probably should have skipped the 1st layer instead though so that the eyes were colored. Layering is a little difficult with the t-shirt vinyl because you have to do each layer separately and they do shrink in between. You can see the tail is very different, but it kind of looks like it's wagging. :)
Next I put an owl on my wife-beater tank top. Again you can see some of the layers but it is still pretty cute. I may add the saying, "Save the Hooters". 

My husband was so impressed that he requested his own! My cartridges are more cutesy than manly but I found this moose on the Give a Hoot cartridge. It was too plain so we had to think of a saying. I used the Schoolbook letters to add the phrase. I probably should have started with this one instead of the others because doing one layer is a whole lot easier.


A few tips on applying vinyl:
1. Make sure you flip your image on the Cricut, especially for lettering! 
2. Do not apply too much blade pressure or it will cut the plastic backing that is necessary for ironing. I started in the middle and ended up reducing it once to 2. 
3. If you accidentally cut the wrong side it is okay, just flip it and start again. I did this on one layer and you couldn't even tell. Of course only if you didn't cut through the backing.
4. Do not set the iron too hot. I almost ruined my first hippo layer even though I had it set on cotton. The setting should be about half way on the dial depending on your iron.
5. Watch the video on Expressions Vinyl. I cannot explain good enough here. This is also where I bought all of my vinyl at an excellent price.


Glass Etching Take 2

I decided to quick do the next jar with the reverse image. Scroll down to see the first jar and directions. If I was thinking I probably could have used the same vinyl cut for both jars, but I wasn't.

This one only took about a half hour since I was already set up. I wiped it off once and then reapplied in a few areas that seemed kind of streaky. Doing a larger area shows the etching more and needs to be a smoother finish. I didn't apply as thick of a coat this time because I didn't want to use so much cream, but it still turned out nicely. I do think I like this one more and it will be really pretty when the candle is lit in a dark room.

Mason Jar Glass Etching


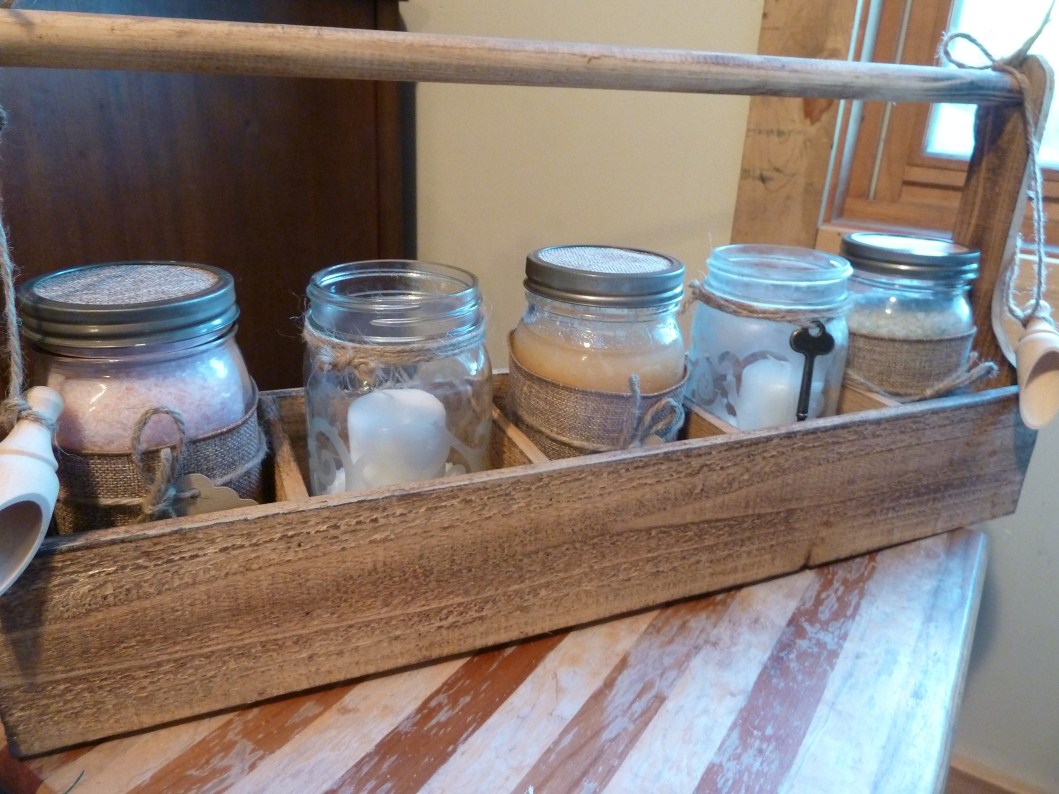
I am in the process of creating a birthday present for my mother-in-law. She decorates with antique and farm style, so I found this adorable wooden caddy.
I'm going to put 5 mason jars inside each container with homemade bath salts, scrubs and candles. Today I created one of the candle jars by etching a design on the outside using my handy dandy Cricut. This is my first time experimenting with glass etching cream. I know I should I have chosen a scrap jar to work on, but I hate wasting time and material like that.

First of all I practiced cutting my design on white paper so that I could figure out what size I wanted without wasting my precious vinyl. I ended up using the Storybook cartridge and the border on page 55 at a size of 3-3/4". I then cut this out on vinyl and removed the inside cut.
Apply a transfer tape over the top to make it easier to transfer all the little pieces to the jar.

Carefully remove the vinyl and tape from the cutting board. This was a little tricky and I had to use my spatula to make sure all the pieces stuck to the tape. Then I transferred it to the jar using the grid to center it. I was worried that the vinyl would not stick to the jar since I removed the backing before I put it on the cutting board, but it worked perfectly.
Remove the tape and press out any bubbles. This took a little while and I used my spatula again to press on bubbles and even pulled some pieces up and re-positioned them. It is pretty important not to have bubbles or the cream will seep under the vinyl. I did leave some because it is tricky on round glass. As you can see I also added tape so that I didn't have to worry about going anywhere I didn't want to with the cream.

Now I was ready to collect supplies. I choose all disposable supplies because the Armour Etch is pretty harsh stuff. I found my Armour Etch on Amazon.com although it should be at Michaels, Jo-Anns or Hobby Lobby. I just didn't feel like searching the store when the price is comparable online. It is really not that common, so it may be hard to locate.

 I then applied a thick coat by dabbing the sponge all over. Make sure it is a pretty even layer but also thick.
 Armour Etch says to leave it on for 60 seconds, but I do not think that is long enough, so I left it on for 10 minutes. I was planning on 15 but grew impatient. :) I wiped the extra cream off with wipes then rinsed the rest off under water. Supposedly you can save the cream, but I didn't think this was necessary. I had some seepage under some of the vinyl but overall the design I wanted turned out nicely. Actually better that I expected for my first try.
 I put Epsom salt on the bottom and then of course the candle. I think it turned out great especially for my first time and was quite easy to do. I think it took about an hour and half to do (one kid's naptime) from start to finish. I think I may try doing a reverse of the design on the next jar.

Using Armour Etch actually erodes the glass very slightly to create this etching looking. It is permanent and can not be rubbed off with your fingers. You could try a similar look with a cloudy vinyl but it would be removable. Armour Etch says that it is dishwasher safe. I plan to using the etching cream on many more projects like vases, glasses, mirrors and kitchen bake-ware. There is so much potential!


Hello Thursday

Cricut has a special called Hello Thursday where they occasionally release new cartridges. Yesterday they released three new ones, but Word of Mouth and Spring Chic are only for the Imagine machine because it also prints as well as cuts. I really wanted one of these machines but what I have read that the ink is expensive and some people complained of lines in their prints, so I will just stick to buying paper for now. I am patiently waiting for Cricut to come out with a Primitive cartridge, but I'm afraid they never will.
Without further ado, here are the new releases:

Word of Mouth


Spring Chic


To The Cabin


I'm not real impressed by these releases especially since I don't have the Imagine machine, but I did get a new cartridge in the mail today that looks awesome. It is called Stretch Your Imagination and has a variety of cuts for every holiday and season, plus a basic card and envelope. I can't wait to play with it!

Stretch Your Imagination


Thursday, May 17, 2012

Enjoy Your Special Day


I created my very own Cricut Creation today. I love calling them that, it just rolls of the tongue nicely. I think it could be used for Birthday, Mother's Day or any special day. The bird is so cute and has so many layers. The whole florals embellished card is very layered and is great for adult birthdays and other holidays. It seems to be themed for Mothers with its phrases though.

The card is cut from Wild Card at 8". Not sure what envelope yet. The bird and phrase are from Florals Embellished. The bird at 4" and the phrase at 3/4". I used tea dye Distress Ink on all the edges of the card to take away to bright white. The bird is also attached with 3d zots to make it pop.

Cricut Creations

Here are two of the newest cards I made. I found the designs on http://fantabulouscricut.blogspot.com which is an excellent site for getting a lot of ideas. Since I am still new to this I just wanted to get the hang of layering them together and adding embellishments before I started creating my own ideas. Cricut takes practice! It also takes a lot of paper! If I didn't live 45 minutes from the craft store I would have already turned in my change bucket for more paper even though I have a lot already. I wish I had purchased more solid colors.
I used the Once Upon a Princess and Create a Critter cartridges for the cute little guys. I also used the Wild Card cart for making the shape of the cards. For the fairy I cut the card at 5 1/2" and the fairy at 4". I have not attempted envelopes yet because I am afraid to waste paper, but I will soon. You can't tell but I brushed the fairy card with a glitter from Martha Stewart that gives it a pretty gleam.

The Farm Begins

Here are a few pictures of our newest animal additions. It is a fun experience but definitely stinks! The chickens are very close to being moved to the coop but right now are in the basement and pooping a lot! I change their newspaper pad daily but it doesn't matter much. The pigs are the easiest animals of all. We feed and check on them 2-3 times a day and that's it. The puppy is probably the most difficult as she has the most energy and is always getting into things she shouldn't. We are trying to get her to stop biting the kids when she is playing with them.

Pooh and Piglet

Our pigs, Pooh and Piglet are friendly and are eating good. We expect to butcher them when they reach 200-250 pounds in about 3-4 months. We are feeding them 16% protein feed plus all of our table scraps. No more wasted food from the kids! I refuse to feed them any type of pork meat though and they hate chocolate cake!

Cornish Cross Chickens


cornish cross
These are cornish cross chickens that are raised as meat chickens, as they will grow fast and should be butchered around 6-8 weeks.

Australian Shepherd


Our pup, Penny, is an Australian Shepherd. 

Home School

I recently decided that I would be homeschooling preschool for our youngest three kids because we live in an area that does not offer a lot of preschools. Unless your child is behind or qualify financially then your options are very limited, so I ordered a simple homeschooling kit from christianbooks.com. I did not realize what I was getting into until the books came in the mail. It is a full year long curriculum with worksheets for math, reading, bible study, and many other subjects. I am pretty impressed and the kids love it!

It took about two weeks to get all the materials and set up the new "classroom" which happens to also be Derek's bedroom. I found an old preschool table at a thrift store, spray painted and its perfect! The kids loved the first class and beg to go to "school" every single day even though I only wanted to do it Monday, Wednesday, and Friday. 

We sing songs, watch short movies that incorporate the curriculum, color pictures, and even have a short gym class each day. I was so impressed that I ordered the first grade math curriculum for my oldest to work on all summer. I don't see myself becoming a full fledged home school parent but I am having fun teaching preschool.