Showing posts with label Cricut- Plantin Schoolbook. Show all posts

Sunday, June 17, 2012

Fourth of July

I used the Cricut to make a cute July 4th/ Flag Day decoration with the kids. I have been collecting tin cans (just the ones that open with can opener, the easy open have sharp edges). My 4 year old and 3 year old helped me paint them with a few coats of blue acrylic paint. I glued red and white ribbon to the bottoms, this was the most expensive part because I did not have any in stock, Michaels had the ribbon 2 for $5 this week. I made my own stickers using the Cricut and an $.89 sheet of foam. So this project cost about $6. I had the paint and twine in my stock pile.


I made the stickers by cutting the foam to fit through the sticker maker.

Then taped them to Cricut board with foam side up. I used tape because the backing is waxy and doesn't stick to the board. 

I had to stick the deep blade in the machine because the regular one just doesn't cut it. With the deep blade in I used blade 5, pressure 5 and speed 4. With blade 6 it cuts all the way through the foam and wax paper but with 5 it doesn't, so it all depends on what you want. It is easier for my 3 year old to peel off the stickers if the backing is not cut through.
 The star is cut at 1-1/2 from the Plantin Schoolbook cartridge.
The leftover foam can be put back in the sticker maker the other way to make custom pop dots. 


Wednesday, May 23, 2012

Menu Planner


This year we are determined to put an addition on our home. Our house has been for sale for 3 years and we've only had 3 showings even dropping the price considerably. In order to make room for our 4th child and to be happier in our house we are adding a new living room, bathroom, bedroom and closets. This means Penny Pinching.

Today was the start of our frugal living. I hung all the clothes out on the line to dry, I didn't drive anywhere and I taped a bunch of shows so that I could suspend our TV for the summer and save $50 a month.

I also decided to be more efficient at planning meals. Here is a Menu Planner I made today based on the design at Clairs Fairy Tale.

Of course I had to use my Cricut, for the lettering (Plantin Schoolbook), the boxes (Once Upon a Princess) and it helped me make perfect squares for the recipe cards. I wish I had done them smaller but I had to fit the ingredients on the back of each card. 

Here is the original I found on Pinterest:

I love being able to use all my little tools. I even got out the Laminator for the cards to make them more durable. I figured I can grab them and take them grocery shopping with me and they will still hold up. I purchased the Laminator off Amazon back in December for $16.99, I never realized how much I would use it. Here is the link, maybe it will go on sale again: Laminator and you can get one too!

I haven't hung the Menu Planner up in my kitchen yet because I am really short on wall space, but I will find a spot because I think it is really cute and should make meals more convenient.

I went through my cookbook and found 32 recipes that are tried and true. No new ones were included. So I have a months rotation before we have to start over again. I think this will help me incorporate more fruits and vegetables into our menu.

I entered this into the Copy Cat Challenge at http://www.kraftygirls.com/ I could enter so many projects into this challenge because I love so many things that people do but this is my favorite right now.

Monday, May 21, 2012

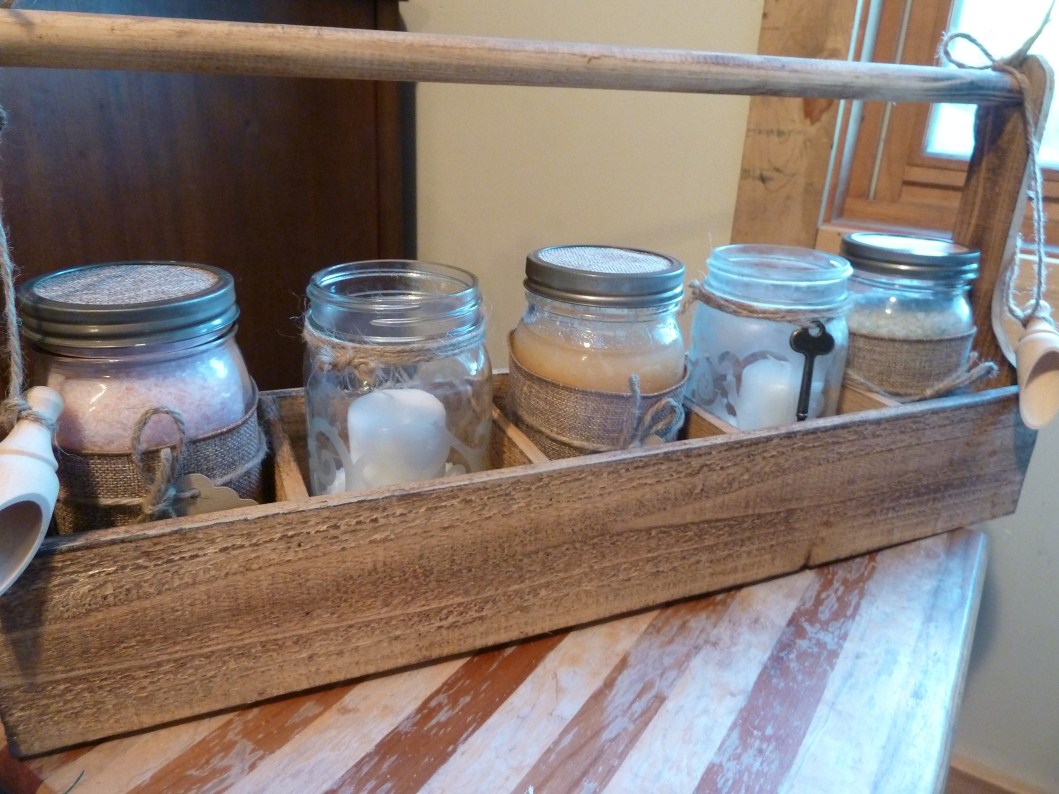
Wooden Caddy for Bath Supplies


A few days ago I posted the mason jar etching project I did and today the UPS dropped off the rest of the supplies so I could finish up the wooden caddy for my mother-in-law. I made bath salts and a bath scrub to put in the other three mason jars.

Bath Salts

Combine 1 part Epsom Salt with 1/4 part Coarse Sea Salt. 
I wasn't sure how much I needed so I did one cup of Epsom salt and 1/4 cup sea salt at a time until the jar was full. Then I dumped into a large glass bowl and added a few drops of food coloring and a few drop of essence oil. I choose Lavender for one and Amazing Grace Woman for the other. I mixed them with my hands because it seemed the best way to get a good combination and break up the coloring.

Sugar Scrub

Ingredients: white sugar, oil , and essence.

This scrub is made from one part sugar and about 1/2 part cocoa butter baby oil. I also added a Mango Apple essence to it and a little yellow and red food coloring.

For mother's day I made a hand scrub that was 2 1/2 cups sugar, 1 cup olive oil and 1/4 cup lemon juice. That turned out really nice and the guys really liked it because it wasn't too girly. This one I was aiming more for her to use in the tub so I kept it sweet smelling.

I printed off labels using Plantin Schoolbook on the Cricut and my HP printer. As you can see I also added burlap ribbon and twine to the jars and spray painted the lids. I also tied two wooden scoops to the ends for the salts.

UPDATE: She loved it and said it matched her decorating style perfectly. She also uses the bath salts a lot, so it was the perfect gift!

First Challenge


I've been following the challenges on http://fantabulouscricut.blogspot.com/ and this week decided to join in the fun!

This year we only have one family member graduating from high school. This is unusual for us with 59 first cousins between my husband and I. We usually have at least 2 or 3 graduates a year, but I guess everyone is starting to get older and we are starting to see more college graduations.

Here is the card I created for this year's graduate. The only cartridge I used was Plantin Schoolbook for the starburst, number and letters. I was expecting to use a cute cartoon image, but I think I'm going to experiment with another one. The #1 is popped up to add dimension and I used a silver pen to add embellishment, other than that I think it is a pretty simple card.

I also submitted to this week's challenge at Craft Spot by Kimberly and
4 Crafty Chicks

Sunday, May 20, 2012

Vinyl Water Bottles

I finally got to sit down to the Cricut again after a day and half away. I'm addicted! I did get to stop at Michael's yesterday though and use a few coupons and get more paper. When I first walked in I found these really cute kid's water bottles for sale for $1. With my coupons I got them for $0.82, so I picked one up for my kids and nieces and nephews. 

Tonight I decorated four of them with vinyl and the Cricut. I used the Create a Critter cartridge to pick out a cute critter for each kid and used the Plantin Schoolbook to spell their names. The critters were 3" and the letters range from 1-1/4" to 1-3/4". I tried some using transfer paper and some without. It is a little tricky either way getting the names straight, but I know the kids won't care either way.


The easiest way is to layer the critters while still on the mat. I tend to skip the bottom layer if I can especially if it is just the black for the eyes. It is also a little easier to cut the vinyl without backing but it can be done either way.